Ruby TK にメニューの追加
リストビューだけでは不便なのでメニューも追加です。

require 'tk'

menubar = TkMenu.new
Tk.root.configure(menu:menubar)
file = TkMenu.new(menubar, tearoff: false)
help = TkMenu.new(menubar, tearoff: false)
menubar.add_cascade(label: "ファイル", underline: 0, menu: file)
menubar.add_cascade(label: "ヘルプ", underline: 0, menu: help)

#ファイルメニューの設定
sel = TkVariable.new(0)
file.add_command(label: "実行", under: 0, command: proc { prostart })
file.add_separator
file.add_radiobutton(label: "選択1", variable: sel, value: 0)
file.add_radiobutton(label: "選択2", variable: sel, value: 1)
file.add_separator
file.add_command(label: "終了", under: 0, command: proc { exit })
Rubyでwhois アプリ
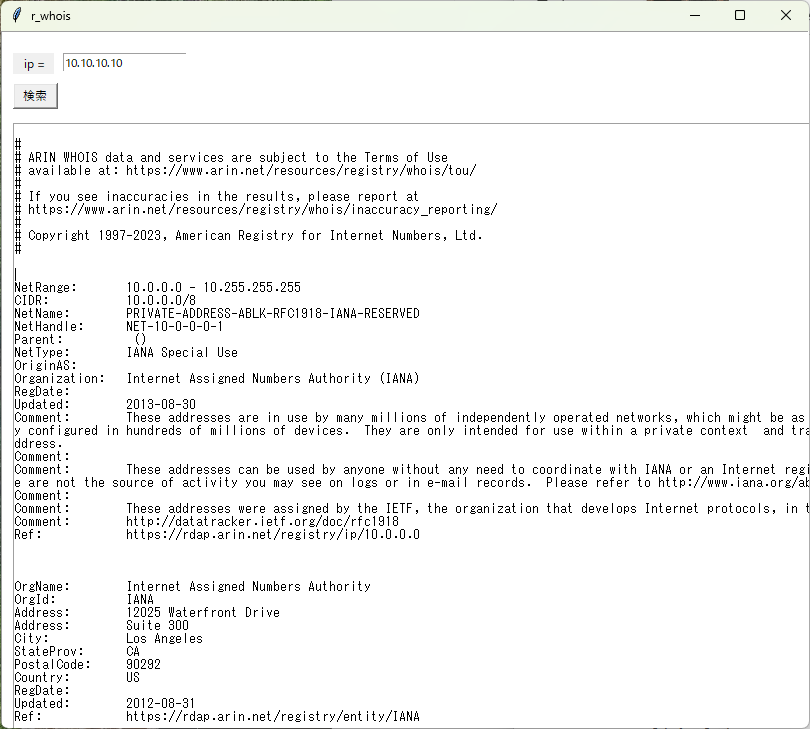
Rubyでwhoisアプリを作ってみました。
ソースはわかりやすいように短くしています。
10行ぐらいで作れました。
ocraでexe化も成功です。
#rubyでwhoisアプリ
require 'whois'
require 'tk'

#whois関数
def whois_proc(a)
	b = Whois::Client.new
	c = b.lookup(a.value)
	d = c.content
	return d
end
#テキストのフレームの作成
txt = TkText.new(width:150,height:50).pack
#ラベル
TkLabel.new(txt) { text ' ip ='; width 5; place 'x'=>10, 'y'=>20 }
#テキストの表示場所
txtbox = TkText.new(txt) {width 140; height 45;place 'x'=>10, 'y'=>90 }
#IP入力
svalue = TkEntry.new(txt) {width 20; place 'x'=>60, 'y'=>20 }
#検索ボタン
TkButton.new(txt) {text '検索'; width 5; place 'x'=>10, 'y'=>50 \
	;command proc {txtbox.insert('end',whois_proc(svalue))}}
Tk.mainloop
Ruby3でtk+ocraの成功
Ruby3でocraを使うとエラーが表示されるようになりました。
いろいろ実験して、実行ファイルが作れるようになりました。
もっと、良い方法があると思います。
■エラー内容
in `_invoke': can't invoke "font" command: application has been destroyed (RuntimeError)
■対応概要
1 ファイルを複写
2 ocraのコマンドを変更
■対応手順
1 ファイルを複写
C:\Ruby31-x64\msys64\ucrt64\binフォルダからC:\Ruby31-x64\binフォルダにファイル2つを複写
・tcl86.dll
・tk86.dll
2 フォルダを複写
C:\Ruby31-x64\msys64\ucrt64\libフォルダからC:\Ruby31-x64\libフォルダにフォルダ2つを複写
・tcl8.6
・tk8.6
3 コマンド引数
ocra aa.rb --no-autoload c:\Ruby31-x64\lib\tcl8.6 c:\Ruby31-x64\lib\tk8.6
毎回、コマンドを入力するのは大変なので、バッチファイルを作りました。
ocra2.bat
ocra %1 --no-autoload c:\Ruby31-x64\lib\tcl8.6 c:\Ruby31-x64\lib\tk8.6
■さいごに
なんだか、パスがないだけの気がします。
RubyでSQLITE3
RubyでSQLITE3
require 'sqlite3'

#データベースの作成
db = SQLite3::Database.new 'test.db'

#idとnameを持つusersテーブルを作成
sql = <<-SQL
	create table users(
		id integer primary key,
		name text
	);
SQL

#usersテーブルを作成
db.execute(sql)

#テーブルにレコードを書きこむ
db.execute('insert into users(name) values(?)','sample1')
db.execute('insert into users(name) values(?)','sample2')

#データを出力する
db.execute('select * from users') do |row|
	p row
end
RubyでWebページのスクレイピング(mechanize)
Rubyには、mechanizeというライブラリを使うと
スクレイピングが簡単にできそうです。
gem install mechanize
■基本 ホームページデータの取得
require 'mechanize'

sitedata = Mechanize.new
page = sitedata.get("https://www.example.com")
puts page.body
page.links
page.title
page.label
と設定することで便利に使うことができます。
■要素の探索
sitedata = Mechanize.new
page = sitedata.get("https://www.example.com")
elements = page.search('h1 a')
puts elements
ここから先は勉強中です。
わかりやすいサイトです。
【RubyでWebスクレイピング】Mechanizeを使ってスクレイピングをする方法【主要機能まとめ】 - shin>>media
■リンクを操作する方法
require 'mechanize'

sitedata = Mechanize.new
page = sitedata.get('https://www.example.com')
data = page.links
data.each do |link|
	puts link.text
	puts link.href
end
■フォームの操作
require 'mechanize'
agent = Mechanize.new
page = agent.get('http://example.com/')
puts page.forms

id_form = page.form_with(id: 'id情報')
# page.form_with(class: 'class情報')

id_form.field_with(name: '要素情報').value = '入力値'
# id_form.field_with(id: 'id情報').value = '入力値'

result_form = agent.submit(id_form)

puts result_form.body
■ログインが必要なサイトへのアクセス
login_form = page.form_with(id: 'id情報')
login_form.field_with(name: 'id').value   = 'id'
login_form.field_with(name: 'pass').value = 'password'
after_login_page = agent.submit(login_form)

puts after_login_page.body
■クッキー情報の収集
login_form = page.form_with(id: 'id情報')
login_form.field_with(name: 'id').value   = 'id'
login_form.field_with(name: 'pass').value = 'password'
after_login_page = agent.submit(login_form)

cookies = agent.cookie_jar
hoge = cookies.map { |cookie| cookie }
Rubyでホームページの取得(1)
Rubyでホームページの取得方法は
open-uriを使う方法が簡単です。
他にはnet/httpを使うと、高度な設定が可能です。
例1 open-uri
require "open-uri"
open("https://www.example.com/" do |f|
    print f.read
end
例2 open-uri
require 'open-uri'
io = OpenURI.open_uri('http://www.example.com')
puts io.read
例3 net/http の例
require "net/http"
url = URI.parse("http://www.example.com')
res = Net::HTTP.get_response(url)
puts res.body
例4 net/http 応用
require "net/http"
uri = URI.parse('http://www.example.com/')
data = Net::HTTP.new(uri.host,uri.port)
data.use_ssl = true
res = data.get(uri.parh)
if res.code.to_i == 200
    puts res.body
else
    puts "#{res.code}:#{res.message}"
end
例5 net/http POSTの例
require "net/http"
Net::HTTP.start("www.example.com",80) do |http|
    response = http.post("/cgi-bin/test.cgi",""
       {Content-Type" => "application/x-www-form-urlencoded"})
end
Rubyでnokogiriの利用
Rubyでnokogiriの利用方法です。
Nokogiriは、Rubyでよく使われている構文解析ライブラリです。
注意としてUTF-8以外の場合は注意が必要
例1
require 'nokogiri'
require 'pp'
require 'open-uri'

url = 'https://www.aaaaa.com'

htdata = Nokogiri::HTML(URI.open(url))
data = htdata.css("h3 a").each do |elem|
    pp elem[:href]
end
例2
require 'nokogiri'
require 'open-uri'
doc =Nokogiri.HTML(open('http://www.nokogiri.org/"))
doc.css('a'.each do |element|
    puts element[:href]
end
例3 ページに含まれるリンクを抽出
require 'open-uri'
requrie 'nokogiri'

doc = Nokogiri.HTML(URI.open("http://www.example.com/"))
#ページに含まれるリンクを抽出
doc.css('a').each do  |elem|
    puts elem[:href]
end
例4 h2のテキストを抽出する
require 'open-uri'
requrie 'nokogiri'

doc = Nokogiri.HTML(URI.open("http://www.example.com/"))
doc.xpath('//h2').each do |elem|
    puts.elem.text
end
|
